
 Posted on
Like anyone who has watched HBO Euphoria featuring Zendaya, I quickly obsessed over the bold make up and fashion looks in the show. The one that stood out to me was Maddy's full on rhinestone prom look. Maybe it was Maddy's attitude paired with the incredibly styling but she elevated what I would otherwise consider to be a regular rhinestone outfit. Whatever it is, she made it iconic.
"Bitch, you're my soulmate"
Since I work with a lot of pop stars, I'm familiar with working with a lot of bling. On most occasions I would dread it because honestly it is so much work. I've once place 30,000 rhinestones by hand! Those were some dark times for me. But I noticed for Maddy's look it was all one piece.
MATERIALS
Our Euphoria materials kit includes all of the below in one package or you can buy it on your own. We've linked the best places to buy it!
- 2 yds 7.5 in. Rhinestone Net $25.00 /yd or 10.5 in. wide Rhinestone Net $32.00/yd
- 1 Piece Silver Metal O Ring 1.5 in diameter $7.99 (Pack of 5)
- 1 yd Black Satin Waistband Elastic 1 in $2.35
- 1 yd Single Rhinestone Trim for straps (no stretch) $7.00
The Fabric
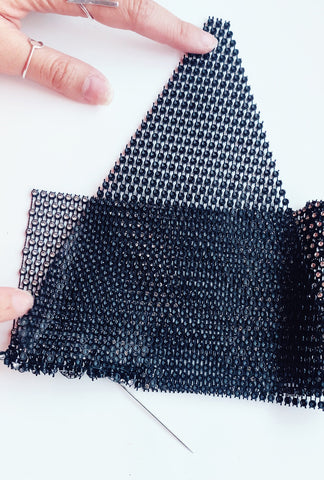
Rhinestone mesh fabric is pretty common now and can be found just about anywhere. There are two types of fabric, one is mesh and one is net. The net one looks more narrow to begin with but will expand to its full width. It has only 2 way stretch. The rhinestone on net looks more like rhinestones on fishnet and has 4 way stretch. For this project we will be working with the rhinestone on net. Most places will most likely sell the narrow version of this at only 7.5 inches wide. This will be ok for those who are of a smaller size of 0-2, max hips being 32 inches wide.
 Rhinestone Net (Correct Fabric)

I got 2 yds of fabric which was exactly enough for a 28 in skirt (over the knee) and the bra. I had nothing left so keep this in mind if you did want it longer like Maddy's in Euphoria which goes to the ankle you will need more than 2 yds.
The rhinestone net fabric comes in two widths 7.5 inch and 10.5 in. The widest width is harder to find and is often sold out. But with some google search you can find it! Right now we do have it in stock for our kits. The other items you will need can be found at your local craft store. I have also linked to online shops that carry the item. It does become more expensive when ordering online.
Locally you can hit up Michael's or Joanns for all the other notions. We've also made it easier on you. You can order the Euphoria Kit Here and it will have everything you need for $75.00.
1 Silver Metal O Ring 1.5 in diameter $7.99 (Pack of 5)
1 yd Black Satin Waistband Elastic 1 in $2.35
1 yd Single Rhinestone Trim for straps (no stretch) $7.00
Taking Measurements
You will need two measurements for this project, your underbust and hip measurements. Write these measurements somewhere you can quickly refer to. Also note when taking measurements, make sure the tape is parallel to the floor to get the most accurate measurement.

The underbust will be the measurement right under your bust divided into 2.
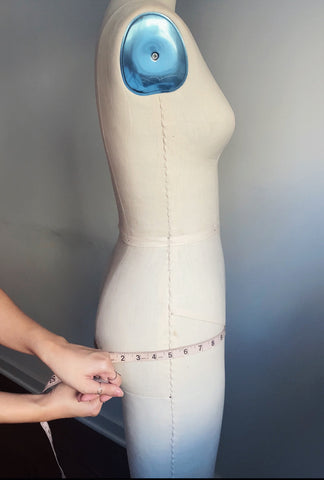
The hip measurement should be taken at the fullest part of your butt.
CUTTING THE FABRIC
The fabric only stretches one way, perpendicular to the straight line edge. When cutting the skirt or the bra band it is important to note that the rhinestones are in a straight line and you will cut along this line. If the rhinestones are staggered then the material isn't in the proper direction of the stretch, the stretch should be going across the body. The only time the rhinestones should be staggered is for the triangle top because you are cutting on the diagonal to get the shape.
HOW TO SEW
The Hand sewing Method
We are going to whip stitch the entire look together along the edge making sure to catch each piece of the net and knotting every other stitch to make sure it is secure.


Start off by wrapping your sewing thread around the first "yarn" of the net fabric

As you wrap the sewing thread around the yarn, pull your needle through the loops to create knots along the way

The hardest part will be starting off. If you can push your needle through the middle of the thread of the net part this will help start you off.

THE TOP
For the top we will cut 2 triangle shape out of the mesh fabric. I had draped my triangle on the dress form to get the right size. If you don't have a dress form my triangle is 6.75 inches across the bottom and then 7 inches tall.

Then we will cut two strips for the band of the top. They will be 3.5 inches tall. The length will be your underbust measurement minus 1 inch.
Line up the triangle pieces to on edge of the strip. Rhinestones should facing together, sew the triangle to the top of the strip. Repeat for the other side.
Now you should have two separate pieces of a triangle attached to a strip. Taking note which is the right and left side, we are now going to take the metal silver o ring and wrap the center front of just the strip around the ring. The wrong side should be facing the ring. Whip stitch this securely around the ring.


Repeat on the other side. now the two halves of your top should be attached at the middle by the ring.

Now we will sew the band together at the back. 1/2 an inch in.


Next will be to cut for the straps, I cut 16 inches and whipstitch it to the top of the triangle top. I would knot it several times at least 5. This is a high stress point.

THE SKIRT Part 1
The skirt will be made with the remaining material. You will fold it in half and cut along the fold. If it is folded correctly the rhinestones will be in a straight line and therefore easy to cut. If your rhinestones are staggered you have folded the material in the wrong direction.
For the skirt we are going to use the entire width of the net so no need to worry about trimming it down vertically. We will cut two pieces that are 28 inches long.

With the rhinestones facing each other and lined up whip stitch all the way down the length. When you are done the two 28 inch pieces should be connected by this side seam.

Lay it flat out and use your finger to go down this seam to make sure you didn't miss any spot when hand sewing. Usually you can easily tell if you missed a spot because it puckers there and wont be smooth.

Now that the skirt is sewn down one side, we will have it open to do the waistband.
THE WAISTBAND
Choose which part of your skirt will be the top and which will be the bottom. Once you do take your elastic and line it up to the top row of your rhinestones. The wrong side of the rhinestone (non shiny side) is lined up to the satin side of the elastic. Then you are going to sew the first row of the rhinestone to the edge of the elastic.
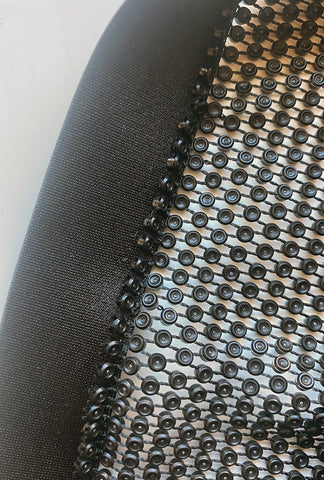 The wrong side
Be careful not to stretch it as you sew. The rhinestone should be in its "resting" not stretched state as you are sewing it to the the edge of the elastic.
 The right side
You will sew the elastic waistband straight across the top of the skirt.
Don't trim the elastic to match the edge of the skirt just yet, leave 1/2 an inch extension on either side.
THE SKIRT PART 2
With the rhinestone facing each other and lined up, you will now sew down the other side of the skirt. I found it easier to start from the bottom of the skirt up towards the elastic waistband because I could see the rhinestones lined up better this way. Sew all the way to the top to where the first row of rhinestone is attached to the elastic.

At this point you will have an excess of elastic since we left 1/2 inch of allowance on either side. You are going to put one elastic end on top of the other to match the skirt edges. With the shiny side of the rhinestone facing you, the elastic here will be folded under and whipstitched to the elastic underneath for a clean finish.


With the elastic folded to the inside of the skirt, tack it the skirt side seam.

Your skirt is now done!
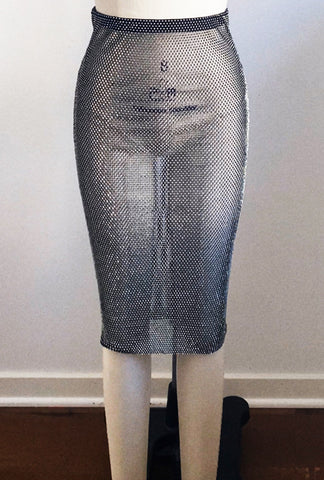
Your Maddy inspired Euphoria Prom look is now completed!

0 comments